Showing posts with label CRM. Show all posts

Tuesday, August 25, 2020

Show Sitemap Sub areas based on Security Roles

 I came across a requirement where we had to show the Sitemap certain areas only to the Application Admins and hide it from the Users.

Yes it can be configured by removing entity privileges for the User Security role but there were dependencies on the entity as it was a lookup.

So removing the security privilege will also take away the permissions to append and view.

So to just show the entities on Sitemap only to Admins not for other Users we have used the functionality of Sitemap editor where without any code it can achieved using Privileges Feature.

Let us consider a scenario where User A is Sales Person and User B is Sales Admin.

I should Hide the Accounts  for User A i.e Sales Person but she should be able to select Account while creating a Contact and Read it too.


Step 1 : Go to Sitemap Editor and of Application and select that entity.


Step 2 : Click on Properties and scroll down towards Advanced > Privileges


Step 3 : Now Sales Admin has privileges on Account to Create, Write or Delete but Sales User does not has. He has only Read Permission. So select the ones which Admins have.


Step 4: Now this Account in Sitemap will be visible only to the Sales Admin not for Sales User as we have configured the Privileges. Publish the changes.


This will enable to hide entity on Sitemap without effecting functionality based on Security Roles.

Things to Remember :

1. If you add Account entity in any other group and do not configure this Privilege Setting, it will be visible due to Read permissions.

2. Even different entities and combinations can be configured to hide or show based on Organization needs.


Monday, August 24, 2020

Update Multi Select Option From Portal using MS Flows

Before Multiselect field option was introduced, we used to implement this using Javascript and HTML either in CRM or Portal.

Now to migrate this functionality to OOB MultiSelect Field you can use either Plugins or MS Flows.

MS Flows are very easy tool to help to migrate the values stored in text fields for a MultiSelect Option Field. This can be used to migrate already present values or from Portals.

So here I have used 2 steps to implement it.

Step 1 : Create a trigger using Common Data Service (current environment) in Flow as shown below.


Step 2 : Next Select Update a Record Action and give the Text field output as input to Multi select 
field.


Here Fav Colour is a MultiSelect Option Set. Sometimes these options will not be shown so select Enter Custom Value.


Give the Multi select text field as input to the Multi Select Option.

Things to Remember :

1. The values in the text field should be in format like 1,2,3  
2. Use only commas in text fields as separators and no ending commas too (as I faced error initially coz of that)
3. Values of multi select field are retrieved like in below image.


4. Create Flows in the Solution of your environment to get the CDS(current environment) connector.

Thursday, August 13, 2020

MultiSelect Field in Dynamics Portal - Easy Solution

In Dynamics 365 Version 9 we got a new Attribute Type i.e Multiselect Option.

But it is not yet supported in PowerApps Portal/Dynamics 365 Portal when they are added on the form.

Multiselect fields are not visible when we utilize them through Web forms or Entity forms in Portal.

So to solve it there are multiple solutions based on requirements.

1. Easy Solution


If you have a Multi select option with fixed Options or which are in less number then this will do good.

Step 1 :  

Create a text field which you will use to save the values of multi select Option from CRM.
Let us assume it as "new_multiselecttext" field.

Step 2 : 

Now we have to do some Custom JS coding to add our fixed Multi Select Option in Entity Form. So hide the text field for users on portal using below code.

$("#new_multiselecttext").hide();

Make sure this is added on the form in CRM to work.

Step 3 : 

Create a multiselect field now and append it to that field where you want to see.

var multiselect = $('<select multiple><option value="1">Red</option><option value="2">Blue</option><option value="3">Green</option><option value="4">Orange</option></select>');
    multiselect.insertAfter("#new_multiselecttext");

Step 4: 

Now to get the selected options to text field we need to add Change property.

multiselect.change(function () {
        ("#new_multiselecttext").val($(this).val());
    });

Step 5: 

It may look like below where Ctrl button is required to select multiple Options.


Whole Code:

$(document).ready(function () {
    var multiselect = $('<select multiple><option value="1">Red</option><option value="2">Blue</option><option value="3">Green</option><option value="4">Orange</option></select>');
    multiselect.insertAfter("#new_multiselecttext");
            $("#new_multiselecttext").hide();
    multiselect.change(function () {
    
      var values = $(this).val();
        $("#new_multiselecttext").val(values);
    });

});


Step 6: 

We are done with Portal side, now to save this values into our actual OOB Multiselect field, write a plugin code which gets triggered on Create or Update of that Text field.

public void Execute(IServiceProvider serviceProvider)
{
	var context = (IPluginExecutionContext)serviceProvider.GetService(typeof(IPluginExecutionContext));

	var entity = context.InputParameters["Target"] as Entity;

	if (entity.Attributes.ContainsKey("new_multiselecttext"))
{ OptionSetValueCollection colours = new OptionSetValueCollection(); foreach (var option in entity.GetAttributeValue("new_multiselecttext").Split(','))
{ colours.Add(new OptionSetValue(int.Parse(option))); } entity["new_favcolour"] = colours; } }

If you have more options which can change or get added in future then you can go for Second Part.. 


Monday, December 17, 2018

Adding Email Signatures with Image Hyperlink

Steps to include images hosted in Portal:
  1.   First Create a Image in a server which is accessible without any authentication.
  2.    If you have portal you can host it there with Admin role, go to the Home page of portal and  in Content Editor, select New à Child file.
  3. Give a Name to the image and browse the image which need to be included in the Email signature and save it. Note the Partial URL, as this will be used to navigate to the image.


4. To use this image as a hyper link in signature, go to home page of portal and select New à Child Page.


      5.  In the General Tab, give the name for Page, note down the Partial URL and select a blank template where image is visible.


            6. Next go to Language Content tab and select the Image icon in Copy section. This is to browse the image created in the previous steps.


7.  Then navigate to the Link tab and give the URL to which the image should link and click on OK.

  8. Image can be observed in Copy section, then save it.
9. Now navigate to the URL of the page created and copy the image.(This is Image with HyperLink)


10.  Now Navigate to Email Signatures in Settings > Templates and select Email Signatures.


11. Click on ‘New’ and give a title to the Email Signature.
12. Paste the image copied in previous steps in Email signature using Ctrl+V.
(Note:Use Internet explorer or Edge browser to copy and paste image in email signature body)

        13. Click on Save button and Set as Default button(optional). Insert Signature can be used on Email if it is not default.
14. After signature is saved and set as default, it will appear when a new email is created as below.


          15. The links can be tested after the email is sent.


NOTE: The images from other URL can be used like above if the image has referenced link without authentication.☺️


Monday, December 10, 2018

Trigger Workflow from CRM Portal


In this blog, you will learn how to trigger a workflow dynamically from a portal

If you have a requirement where workflow need to be triggered for more than one record in the background without entity grid button then this will be helpful.

The built in workflow trigger service lives at [portalUrl]/_services/execute-workflow/[portalscopeid]. You can invoke this service by performing a POST to this URL.

Step1 :  First note down the portalscopeid of your portal. If it is a customer portal then GUID value is 7B138792-1090-45B6-9241-8F8D96D8C372.


Step 2: Get the workflow GUID id which needs to be triggered.

Step 3:Copy the below code in Custom Javascript where workflow needs to be called

// JavaScript source code
var recordid = entityrecordid;// Pass the entity record guid for which workflow needs to be triggered                        
var wsid = portalscopeid; //As mentioned in step 1
var wfid = workflowid;// Workflow Guid value                   
if (typeof (wsid) !== 'undefined'&&wsid.length> 0 && typeof (wfid) !== 'undefined'&& wfid.length> 0)
{
var entity = { LogicalName: "entityname", Id: recordid };
var workflow = { LogicalName: "workflow", Id: wfid };
var payload = { entity: entity, workflow: workflow };
varjsonPayload = JSON.stringify(payload);
shell.ajaxSafePost(
        {
        type: "POST",
contentType: "application/json",
            url: "/_services/execute-workflow/" + wsid,
            data: jsonPayload
        }).done(function (msg)
        {
alert("Workflow executed");
        }).fail(function (msg)
        {
            alert("Danger");
        })
}


Step 4: This will trigger the workflow in the CRM.

The built-in services are hidden gems that could really streamline your customisation efforts. There are built-in support facilities that make invoking them relatively easy. You however need to consider your scenario carefully as these are not documented, and therefore may change without notice.

Below is the screenshot for such services which are defined in the RegisterArea method of the Site.Areas.Portal.PortalAreaRegistration class, which is defined in the file \Areas\Portal\PortalAreaRegistration.cs of the Portal project.


This is very useful when any out of box service need to be triggered from portal. ☺️

Sunday, December 9, 2018

Hide Out of box Delete Button in CRM

The visibility of Ribbon buttons are controlled by its associated command. Commands of these Buttons can be used to control the rules.
Using the Ribbon Workbench, it is easy to customize an 'Out of the Box' command and add a Display Rule  or Enable rule.

The answer to hide a Delete button based on any condition like user roles can be done as follows.

  1.  Load the custom entity of the button into the Ribbon Workbench.
  2. Select the button you want to modify. For example I have taken a DELETE button.


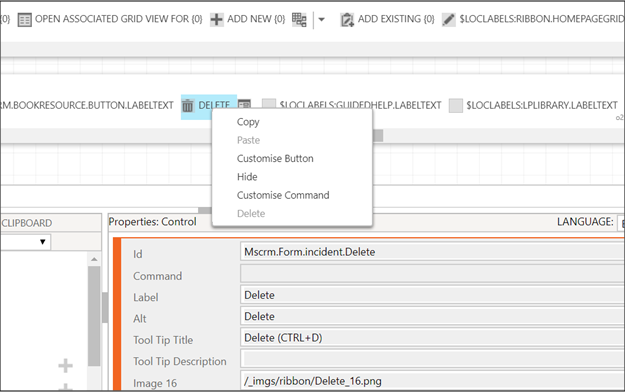
  3. Right click on button and select the “Customise Button” option.
  4. Notice a command is created for the button as Mscrm.DeletePrimaryRecord.
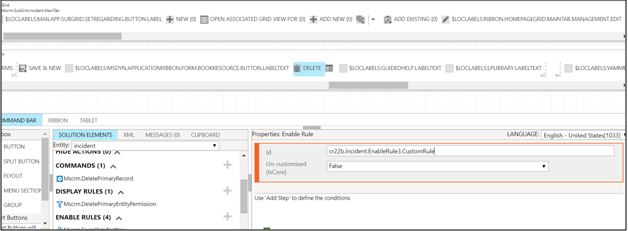
  5. Select that command and click on Add Enable Rule.
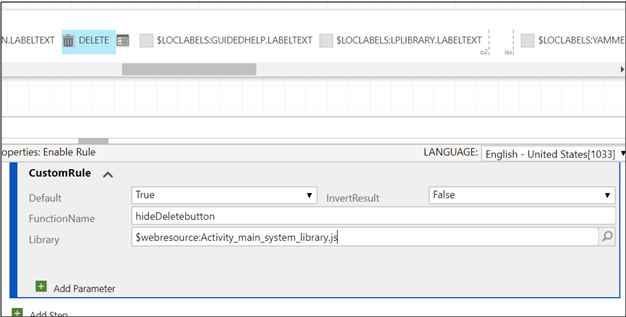
  6. In the Add Step select Custom rule for javascript control. Use this kind of rule to call a function in a JavaScript Library that returns a Boolean value.
  7.  Note:
    Custom rules that do not return a value quickly can affect the performance of the ribbon. If you have to perform logic that might take some time to complete, use the following strategy to make your custom rule asynchronous:
    ·         Define a rule that checks for a custom object. You might check for an object such as Window.ContosoCustomObject.RuleIsTrue that you just attach to the Window.
    ·         If that object exists, return it.
    ·         If that object does not exist, define the object and set the value as false.
    ·         Before you return a value, use settimeout to execute an asynchronous callback function to re-set the object. Then return false.
    ·         After the callback function has performed the operations that are required to determine the correct result, it sets the value of the object and uses the refreshRibbon method to refresh the ribbon.
    ·         When the ribbon is refreshed, it detects the object together with the accurate value set and the rule is evaluated.
  8. Give the function name and javascript webresource which evaluates your condition like checks Admin role  to show or hide the button and returns a Boolean value.
  9. When the function returns true the button will be visible on the form else hidden. Below is the code to check whether user is Administrator and returns a Boolean value.

//Javascript code
var roleNameArray = new Array();
var isAdmin= false;
function checkUserRole() {


var currentUserRoles = Xrm.Page.context.getUserRoles();

for (var i = 0; i<currentUserRoles.length; i++) {
var userRoleId = currentUserRoles[i];
getRoleName(userRoleId);

    }

if (roleNameArray.indexOf("System Administrator") > -1)
return true;
else
return false;
}
function getRoleName(userRoleId) {

var query = "name";
SDK.WEBAPI.retrieveRecord(userRoleId, "role", query, null, setRoleBasedSecurity, errorCallback);
}

function setRoleBasedSecurity(data) {

roleNameArray.push(data.name)
}
function hideDeletebn() {
isAdmin = checkUserRole();
return isAdmin;
}


Save and publish the Ribbon work bench.This will hide the Delete button for the users who doesn’t have Admin role.☺️


Show Sitemap Sub areas based on Security Roles

 I came across a requirement where we had to show the Sitemap certain areas only to the Application Admins and hide it from the Users. Yes i...